2: Creating your story

As already mentioned before in other articles, it is your story that will help you in captivating your audience and at the same time help you in staying on track and remembering your lines. Storytelling has been around for centuries and for good reasons! Storytelling is all about involving various elements and making them come together to create a compelling narrative. For example, you can present on the most boring topic in the world but by making it a story and including certain elements of storytelling, you can make your audience relate or live through the events you are describing and make this boring topic very interesting.
Don't feel like reading? Check out the video at the bottom of the article!
Some of the elements that are often used are relatable characters or events, emotional connections, relevance to current news items, conflict and resolution, clear message or purpose and vivid imagery, and even flat-out fantasy, like a Disney movie. In a Disney story, they will first introduce you with the main character who somehow always falls in love with someone she can’t have, a lot of things happen while trying to get the attention from a handsome prince and against all odds, they fall in love and live happily ever after. At the start of the movie, you pretty much know how it is going to end and yet, you are on the tip of your chair to hear about the middle part.
No worries, you don’t need to know all of this for now and what you do need to know is explained over the next few pages, just realize that there is a lot to learn on this subject and personally it is a subject that I became very interested in.
In this chapter we will write the story and try to include some first elements of storytelling. Given the quality of the average presentation out there, I am pretty sure that this will already set you apart from the others. At a later stage we will dive into voice control and body language, which will add a completely new dimension to your story, making it even better.
For now, let’s focus on writing the story for your presentation, with storytelling in mind!
We will do this in small steps to make sure you focus on one thing at a time. This will limit the chances of making mistakes due to multitasking and I noticed it increases creativity as well. Another good thing about doing it one step at a time, is that you can take breaks in between to clear your mind and be fresh before starting the next step. Also, don’t be scared to change things while working through your steps. The first item we will tackle is the “about” and while you go through the other steps, you might find that your “about” needs changing. My presentations generally evolve throughout the entire process and go through many changes, which is good. It means you are continuously improving your story with new thoughts.
The tools I use for this part
Notes app (Pen and Paper), Sharpie & Post-It notes.
For each item below I will tell you what I do as this changes per item.
What is it about?
In the previous chapter we found what the event is about and now it is time to figure out what your presentation will be about. You probably already have a good idea of what it will be, but if in case you do not, take a few minutes to think about this one. Once you have it, try to translate it into a just a few lines as sort of an introduction to what you will talk about, but make sure you don’t give away too much. The first reason to do this is to make sure you have a guideline to follow in case you get stuck, while leaving out details will still give you the flexibility of playing around a bit. At the same time, this text can be used by the host of the event, who sometimes like to add some information about your presentation to their website, agenda or share it on their social media accounts. If they don’t do it, you might want to do this yourself to boost up your rankings a bit ;)
Write this down in your notes, so you can revisit it at a later stage if needed.
The key to defining your goal(s)!
One of the things I miss in many presentations (including my own, until recently), is a goal. What is the reason the audience should spent their time listening to you? Do you have a message or information to share, or do they need to take certain actions like deciding or buying something? Whatever it is, there must be a reason for your audience to stay seated and not fall asleep. These are your goals, also called “key-takeaways” or “key points” and are the items that you can use to keep you on track while writing your story and keep your audience engaged while you are on stage. They also add meaning to your presentation, which increases your credibility and memorable.
I always try to stick with a single major key point, maybe 1 or 2 side points, but that’s it. Don’t overdo it, as your audience will need time to process. In case your presentation will span over multiple, unconnected subjects, you could decide to have a goal for each subject, but you need to make sure your audience understands that you are talking about something else. Each subject needs to be opened and closed and have a mini pause build in between them. Again, you want to give your audience time to process, something they normally do when presenters swap the stage.
Write down your goal(s) as one-liners for yourself in your notes.
Drafting your outline
You now know what your story will be about and what some of the key points are that you want to bring to your audience, which means you are ready to work on your story. The first step that works best for me is to simply think about my story as “chapters” or “stages”. What are the stages the story needs to go through and what is the best order for these stages? This order is also the first step in making your story flow, like the Disney movie we spoke about earlier, but let’s tackle that later. First, we need to define these stages.
To give an example, let’s say you are presenting about the opening of your pizzeria in Amsterdam, which is a spin-off from a very successful pizzeria in Italy. You could start-off with saying something about the move to Amsterdam followed by the ingredients and menu. Then talk about the rich Italian history and finally, invite people to come by, showing them the address and website. Notice how this last stage is probably the goal of this presentation?
With this example in mind, you can create short and catchy headlines, which in this case will be something like “Moving to Amsterdam”, “Ingredients”, “Italian History” and “Try it yourself!”.
Don’t overthink them to much yet, as they will change, all you want for now are some guidelines to work by.
Write these down in your notes as bullet points with bold text or in a different color.
Make it flow!
Knowing that things will still change, the next step will be about adding in details, and I always catch myself trying to practice the story already. This means that I will also start memorizing parts of it in the order I practiced them, so for me it’s best to think about the flow of the story, before adding in the details.
Sticking to the pizzeria example, the order in which we wrote it down might seem right, but if you really look at it, the order is not logical. The history is currently the third in line, while it is the first thing that happened. This one simply must move to the beginning. On top of this, there is another thing to play with here, which might be a bit out of scope for this book, but I want to make you aware about this due to the power it can give to your presentation. The goal of the pizzeria presentation is to get the audience to eat the pizzas from this pizzeria and one way to do this is to work on their emotions.
Have you ever had that feeling you wanted something so badly, but you couldn’t? It was either too expensive or simply not available in your region… Did this make you want it even more? I bet it did and this emotion is very easy to mimic with a topic like food.
In case of the pizzeria, we can mimic this by not saying anything about the Amsterdam pizzeria until the very end. We will just talk about the Italian pizzeria and its history, followed by the fresh ingredients that are used to make these nice pizzas and only when all that information is presented, the information about moving to Amsterdam will be shown. We will add more juicy details later, but you can already see that we will make the audience imagine some delicious pizzas, which will make them hungry, and since you are talking about the Italian pizzeria, it is out of reach, making them want it even more! Imagine what happens when you tell them, that as of today, it is available in their region… They will want to run and get it! Imagine what would happen when you add the juicy details to your story.
Based on the above, I would change the order of the headlines a bit to something like this: “Italian History”, “Fresh, Local Ingredients”, “Authentic wood burning oven”, “Menu from the chef”, “Moving to Amsterdam”.
I added some more details to the headlines, making them catchier and more descriptive, but still short. You can already start to see we are trying to make the audience in love with the idea of this fresh pizza, making them so hungry for something far away, and then bring it within reach!
Don’t forget to change your notes with any updates you made.
Adding the details
Once you are satisfied with your topics and the order they are in, it is time to write the details of the story.
For each topic you have in your notes, start thinking about what you want to say about that topic. Make sure not to go into too much detail, we are looking for “medium level” details here.
Sticking to medium level details will give you some flexibility in the next topic and on this level can be used as a guide in case you will create slides or when you start practicing.
Sticking with the pizzeria example, I wrote down some details that I think will add value to the presentation in some way and this made it look like the below in my notes.
- Italian History
- 150 years old
- Located in a little village called …
- 5 generations of chefs
- 1 family
- Fresh Local Ingredients
- Seasonal recipes
- Buffalo mozzarella from local farmers
- 100% locally produced ingredients
- Fresh from the land
- Authentic wood burning oven
- Authentic, hand build oven
- As old as the restaurant
- 100% natural oak wood
- Has been burning since day 1
- Menu from the chef
- …
- Moving to Amsterdam
- …
As you can see, I keep it with one-liners. The story is starting to take shape now and it becomes clear what we want to say. Generally speaking, I will take a few days to let my mind come up with items to add or delete, but if I am in a squeeze for time, I will simply block an hour and find a quiet place to do this.
Breathe life into your story!
Once you divided your topics with multiple details, it is time to make it come to life! The first step is to again get some flow into your storyline by looking at the details and see if they are in the right order. The focus this time is to make sure your details flow among each other, but probably more important, that the order between the main topics also make sense. For example, the last detail within the “Italian History” topic, should smoothly flow with the first detail within the “Fresh Local Ingredients” topic. The goal here is to make it a single story from beginning to end, taking away the feeling that you are talking about different chapters. This might mean that you will need to reorder your topics again.
You can still use your notes for this, especially if you are on the move a lot, but I try to block some time in my agenda and find a suitable place where I can sit in peace and use a part of the wall for longer periods of time, preferably multiple days. I then write down each of my topics on a post-it and put them horizontally next to each other with a few centimeters of space in between. Once I did that, I write down each detail on a different color post-it and put them vertically underneath the topic they belong to as shown in Figure 1 below.
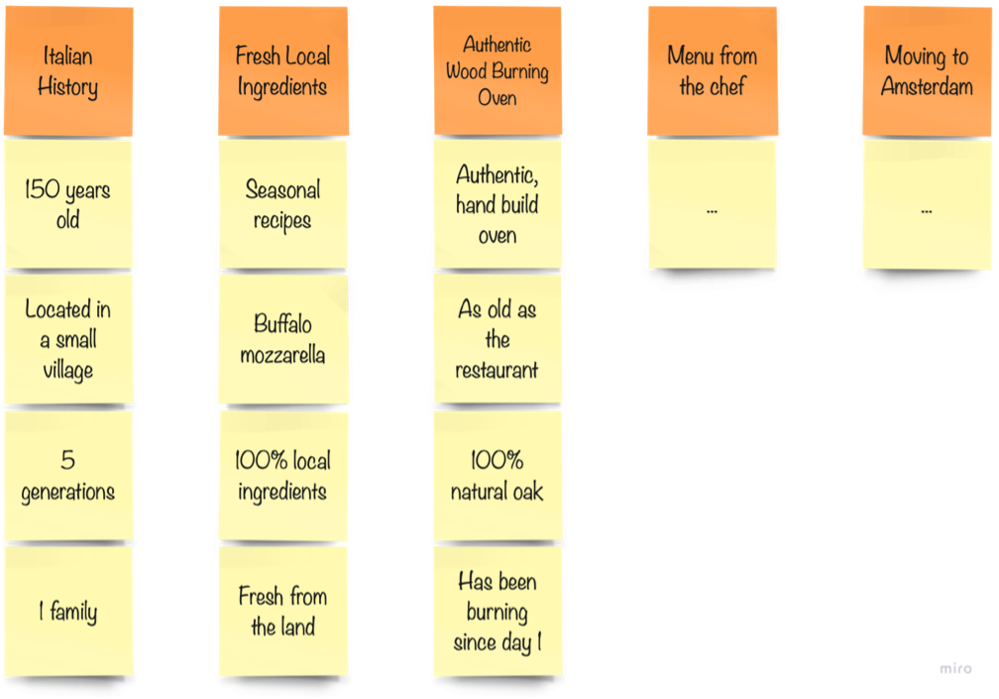
Once I have everything written down, I simply start reading the details in order and see how it feels and sounds. Most often, I will find new topics that are important enough to add to the list, while I will also call out many things that I will not write down. We are still working on a “medium” level of the story, so the really small details I will leave out for now. We will catch those later.
While reading out the details on the post-it’s, I listen for the flow of the story. Does it make sense? Can I flawlessly go from one topic to the next or is it missing something? As said before, don’t worry about reorganizing it all if that makes your story better.
In the case above, I see 2 details that align so nicely, being the “Italian History / 150 years old” and the “Authentic Oven / As old as the restaurant”. These two basically say the same thing and can be used as a nice bridge between the two topics. This means that we need to reorder those topics and details.
I would also change the order of the “Italian History” to start with the location and the information that it has been in the same family for 5 generations, after which we can mention how old it is before flowing to the wood burning oven being just as old. From there we can go to saying something about it being hand build and burning since day 1 on 100% locally cut, natural oak wood.
Since we are already talking about local wood, you can make an easy bridge towards the local ingredients, but then I get into a bit of a jiffy.
There is a nice flow from the “fresh of the land” and the “seasonal recipes”, which can flow well into the menu from the chef, but we also have the “mozzarella”, which I think really adds value. We don’t want to lose value but at first glance I don’t see an easy way to fit it in, so it’s time to stir things up a little.
We want to say the mozzarella is produced by local farmers, which we can combine with the local ingredients. Next, we change the post-it for the “fresh from the land” to “fresh from the land or farmer!” resulting in very tasty “seasonal recipes”.
By now, I think you get the idea. The goal is simply to make sure everything flows nicely together, creating a solid and smooth story. I will leave you to think about the last two topics in the pizzeria example, but after all the above changes are made, the new order is show below in Figure 2.
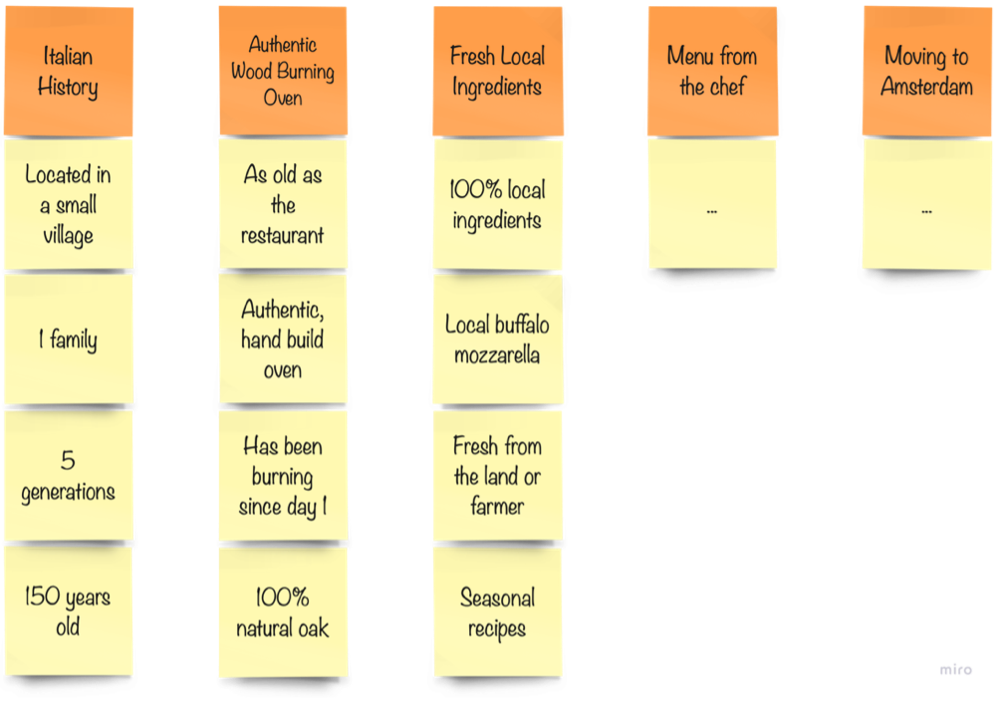
Figure 2: Final version of pizzeria (in Miro)
Once you are completely happy with the result, make sure to update your notes again.
Openings & Endings
Not covered before yet, but aside from a great story, there are two more things that can make or break your presentation. These are your opening and ending. The opening is all about getting your audience’s attention from the start, while your ending has the focus on delivering the punchline, making it memorable!
You can argue if you should already think about openings and endings at this stage. Some say that your story will dictate your opening or ending, while other, including myself, believe that this goes both ways. It is my believe that having a medium level story gives you enough information to create your opening, while also providing you with some flexibility. At this stage, you are not stuck yet to the story you created, you can adjust it if needed to suite your needs.
Let’s start with the opening. By default, people seem to open with an introduction of themselves. Something like “Hi, my name is Tim, and I will talk about a pizzeria today”. Sounds like this makes perfect sense, but believe it or not, your audience will probably fall asleep or check out at minimum. Instead of using an opening like this, think about those great presentations you see on tv or on Ted talks. These people never start with an introduction of themselves. They generally start with some kind of relatable story or witty anecdote, which make you laugh or get you interested in what else they have to say. In some cases, you can relate so much with the story, that you feel like the presentation is about you or someone you know. Whatever it is, it makes you sit on the tip of your chair, and you want to hear more. You become captivated!
This is the sole purpose of the opening, getting your audience captivated and wanting to know more about what you will share with them!
In case of the pizzeria, we can even combine this with the goal of making the audience run for the pizza’s by planting a mental image of a delicious pizza. This presentation can be started with a very short, but impacting story…
“Have you ever had one of those perfectly baked, fresh out of the stone oven pizza’s, with a nice, lightly burned, crunchy crust? With the tastiest sauce and toppings and off-course that melted cheese oozing down the sides as you lift your slice towards your mount. You know which one I mean right? The ones you can only get in those authentic little Italian pizzerias. The ones that make your mouth wet by just thinking about it. Today, I will introduce you to one of these authentic little pizzerias, that makes the best pizza’s…””
Just writing this makes me hungry for pizza already! What did this do to you?
You can see that the intention of an opening like this is all about making the audience want a pizza and it even ends with a bridge towards the first subject. The end of this opening can be adjusted to introduce yourself with something like “My name is Tim and today, I will introduce you to one of those authentic pizzerias…”” or you can simply continue with your story right away and leave your name for the very end or just skip it.
Where the opening is about captivating your audience and prepare them for the story to come, the ending is to get them moving, or at the minimum, to make them remember your message. It is focused on one thing, and one thing only. Your goal!
You can have a great opening and a great story, but chances are that if you don’t repeat your goal, your audience will forget about it before the applause has finished and therefor you want to repeat it one last time. You can use catchy or witty comments here, but the best is to keep it short and memorable. If you haven’t done so before, you have the option to add your name in your ending as well.
For the pizza place, I would probably go for something like “My name is Tim, and I am off to get myself one of these delicious authentic pizzas’! Who’s joining me?” or without the name “Man… I am hungry now! Who is joining me for one of these pizza’s right here in Amsterdam!”
As you can see, the goal of the pizzeria presentation was to get them to the Amsterdam pizzeria, and this is exactly what you are telling the audience to do with an ending like this.
Other great ways to end you presentation are by closing with a brainteaser, something your audience can think about during their trip home or to discuss with others over coffee. Something like “What is it that makes these authentic pizzas so delicious? Is it the crust? The ingredients? All the above? Let me know your thoughts during the next coffee break!”
Off-course, each presentation is different and in case of the pizzeria it was pretty easy to find some nice lines, but what really helps with your openings and endings is to have an extremely clear goal written down for yourself and especially with the opening, to have a clue on where your story will start so you can make a bridge.
Write down the opening and ending in full sentences, exactly as you wish to say them once you are on stage. The opening goes above your list of topics and details and the ending goes below, so you have them in order of occurrence right away.
Timing it all
This one is all about timing yourself, just to make sure you will stay within your given timeframe once you stand on stage. You already know how much time you have to present your story from your preparations and in this chapter, we will start practicing and shaping the final pieces of the puzzle to make sure you stay within this timeframe.
Be aware, it might very well be that you are faster or slower once you are on stage. This is completely normal as most people will start to talk faster once they are nervous. Chances are, during your practice rounds you will be less nervous compared to when you are on stage. For now, don’t worry about this. As experience grows you will learn to compensate, but I do want to make you aware of this deviation.
Going back to the subject at hand. We need a new tool, a stopwatch. You will most likely have one on your phone, so use that one, otherwise, you can use websites like online-stopwatch.com
Next you want to take out your notes with your opening, details, and your closing text and all you are going to do is simply time yourself while you read these out loud. Don’t try to add any new details yet, just read these out as they are. Start with your opening, then read out the details, but make sure you skip the topics and finish with your ending. Try to read in a normal pace, time yourself as you repeat this 3 times.
Try to calculate the average time of these 3 attempts and compare that to the amount of time you have on stage.
Let’s start with the worst-case scenario, your current text is already longer er equal to the amount of time you are allowed to take on stage. This gives you two options; the easiest one is to ask for more time, which sometimes is no issue but other times the host is on a tight schedule. Another option is to shorten your either your story, opening or ending. You can even decide to skip your opening all together, but whatever you do, leave your story with the ending in place. These are the most important and thus you don’t want to lose those. If you decide to shorten your story, simply cutout the pieces that add the least amount of value to your goal and make sure the rest of the story still flows. Basically, you go back to the chapter “Making it flow”.
If you still have time left, you are in a better position, and we can proceed with the next step. Adding in the actual story, which is rather simple to do. For each of the details, I simply write underneath it what I want to say once I am on stage. Depending on how much time we still had left, I might make these one or two sentences. This will make your notes look something like this
- Opening
- “Have you ever had one of those perfect stone oven pizza’s, with a nice, lightly burned, crunchy crust? With the tastiest sauce and toppings and off-course that melted cheese oozing down the sides as you lift your slice towards your mount. You know which one I mean right? The ones you can only get in those authentic little Italian pizzerias and make your mouth wet by just thinking about it. Today, I will introduce you to one of those authentic pizzerias…”
- Italian History
- Located in a little village called …
- “Located in a little village called San Sigismondo, in the northern regions of Italy”
- 1 family
- “a single family decided to start their own pizzeria”
- 5 generations of chefs
- “5 generations later, it is still owned by the same family”
- 150 years old
- “making this little, authentic pizzeria 150 years old!”
- Authentic wood burning oven
- As old as the restaurant
- “What makes this pizzeria extra special, is the oven, which is just as old as the pizzeria itself!”
- Authentic, hand build oven
- “This authentic oven was hand build by the original founder himself………”
- As old as the restaurant
- Located in a little village called …
As you can see, I try to keep the actual text short and align with the next piece of text. While writing these out, you need to make sure they flow from one line to the next, from one topic to the next, like an actual story or movie does as well.
Once you did this for all your details, it is time for another round of timing yourself. Same principle as before, but now you will read your opening, the text you just created and the ending. Again, time yourself as you repeat this 3 times to get a nice average again and keep repeating this until you reach the amount of time you have for your presentation.
In case you find yourself stuck and not having enough text to fill up your timeslot, see if you can add in another topic to talk about, just make sure it always aligns with your story and preferably also adds value to your goal. If you still can’t make it long enough, think about some fun facts to add somewhere in between or maybe some interaction with your audience. You can also decide to make your opening or ending a bit longer.
One of the benefits I noticed with the approach described here is that it makes you practice your text already and you will for sure start remembering parts of it. On top of this, you will constantly find better ways of saying things as you are trying to make it smoother and I strongly belief this forces you to use your own words as well, helping you memorize it even better.
Make sure to keep updating your notes as you go so you always have the latest version at hand. Nothing worse than doing all this work and loosing it in the process.
Where to go next?
Once you reach this point, your story is ready and it is time to look at the next step, "To slide, or not to slide..."…
Check out the video about this article!
